
Years ago I took a shot at learning how to take photos with a big camera with manual controls and it was a big mess of "try everything and hope something works".
...and I was shooting on film. But times have changed and with digital, there is literally no additional cost involved in shooting 50 versions of the same photo.
But that's not very rewarding and I wish that someone had given me a couple basic lessons to get me started.
So, after figuring this stuff out by trial and error over the last few years, I wrote this guide as a primer. I'll go over the basic settings on your camera, tell you what they do, how they work together and when it might make sense to use automatic modes.
Ready? Get out your camera and follow along. Also, here sort of a director's note: On each image in this post - and generally across my site - you can find the EXIF data, or the exposure information for the photo embedded in the black border. I started doing it awhile ago because I'm always curious when looking at the photos of others and have learned a lot by paying attention to these details.
Aperture, Shutter Speed and ISO- A Three Legged Stool
There are 3 basic settings that are common to most every method of making photos. Shutter Speed, Aperture and ISO. My film cameras literally only have these three settings. Modern digital cameras have a lot more things you can adjust, but these are the basics and everything else is just a variation. In order to manually control one, you need to understand how all three work and how they affect each other.
The Mode Dial
Your camera probably has a few modes on a dial or in a menu labeled M, A, S, P and some green label or box that represents Full automatic. I'm not going to talk about Automatic or P – which is Program mode as they both leave most of the decision making to the camera. While there's a time and place for that, we're dealing with more of a hands-on approach here.
M stands for Manual, where – surprise, surprise – you manually choose all three settings. The other modes are presets that allow you to choose one (or more) of the three parameters and allow the camera to take care of the rest.
If you are a real hands-on sort of learner, Just pick one parameter and take the same photo at every setting to see what it does. Do this with shutter, aperture and ISO. Start with fairly neutral settings across the board. Shutter at 100, aperture at 5.6, ISO at 100.
So with that, lets talk about the big three
Aperture
The aperture, is the camera's iris, which controls how much light is allowed to reach the sensor or film. It might be helpful to think of the way a human iris constricts when you go from a dark room to bright daylight. The aperture measurement number, also called the f/stop, is a measurement of the lens's focal length divided by the width of the aperture opening . The "f" stands for Focal length. A smaller f/stop number means the aperture is larger or more open. A larger number means that the iris is constricted, often referred to as "stopped down"
While the aperture controls the amount of light that reaches the sensor of the camera, It's also important to note that the aperture also controls depth of field. Depth of Field is the term we use in photography to describe how much of the scene is in focus.
The wider your aperture is set, the narrower the depth of field. This would be useful for a portrait where you want to isolate the subject of your photo and have the background appear blurry and out of focus. It's possible to have such a narrow depth of field that a person's eye ball is in focus, but the end of their eyelashes are blurry.
The more stopped down and small your aperture is, the wider your depth of field. This is how most landscape photos are made, where there are a lot of important details in the photo that should all be in focus.
How does this apply to your camera gear?
Most lenses for modern cameras have the ability to stop down to f/18 or f/22 which makes them well-suited to landscape photos. Most any kit zoom lens will do great for this purpose, but a lot of people move to a dedicated camera because they want to make photos with blurry backgrounds or they are wanting to shoot in low light. If this is your goal you will want to open up the aperture as wide as possible.
The lens that comes with most intermediate level cameras is a basic zoom. This type of lens usually has a maximum (largest) aperture of f/3.5 when it is at its widest focal length and f/5.6 when you are fully zoomed in. Remember how the f/stop is focal length divided by the size of the aperture? Because the focal length changes with a zoom lens, you actually need a larger aperture opening at longer focal lengths to get the same f/stop. Unfortunately while zoom lenses are available with larger apertures, that larger opening requires larger glass, more weight and a higher price.
If you are planning to take lots of photos of people and find that you aren't getting a shallow enough depth of field from your kit zoom lens, I would strongly recommend making your first upgrade a prime fixed focal length lens such as a 50mm f/1.8. Most camera systems have a pretty affordable 50mm lens in the $200-$300 range. This type of lens has a much larger glass element and a larger aperture for better low-light performance and narrow depth of field. As a growing photographer, this will open up all sorts of options and show you the value of a good fixed focal length prime lens.
While not specific to aperture, focal length also has a large impact on depth of field. Shorter focal lengths with a wider angle of view such as 18mm have a naturally large depth of field. A longer focal length like 50mm has a tighter field of view and will also have smaller depth of field at the same aperture setting. You can use this to your advantage by changing to a longer focal length to get a shallower depth of field.
The A mode allows you to concern yourself only with Aperture while the camera chooses the shutter speed for you. If you use a larger aperture, the camera will choose a faster shutter speed to compensate for the extra light. If you use a smaller aperture, it will do the opposite and choose a longer shutter speed.
Shutter Speed
The shutter is a curtain that controls how long the image is exposed to the sensor (or film).
A slow shutter spead (anything longer than about 1/80 of a second) will allow more light to reach the sensor and is useful in low-light conditions. A shorter shutter speed, is useful in bright, well lit conditions and can also be useful to avoid blur caused by people moving – including you, the photographer. If you get into the 1/1000+ range, you can get great stopped motion shots of sports and other fast paced stuff.
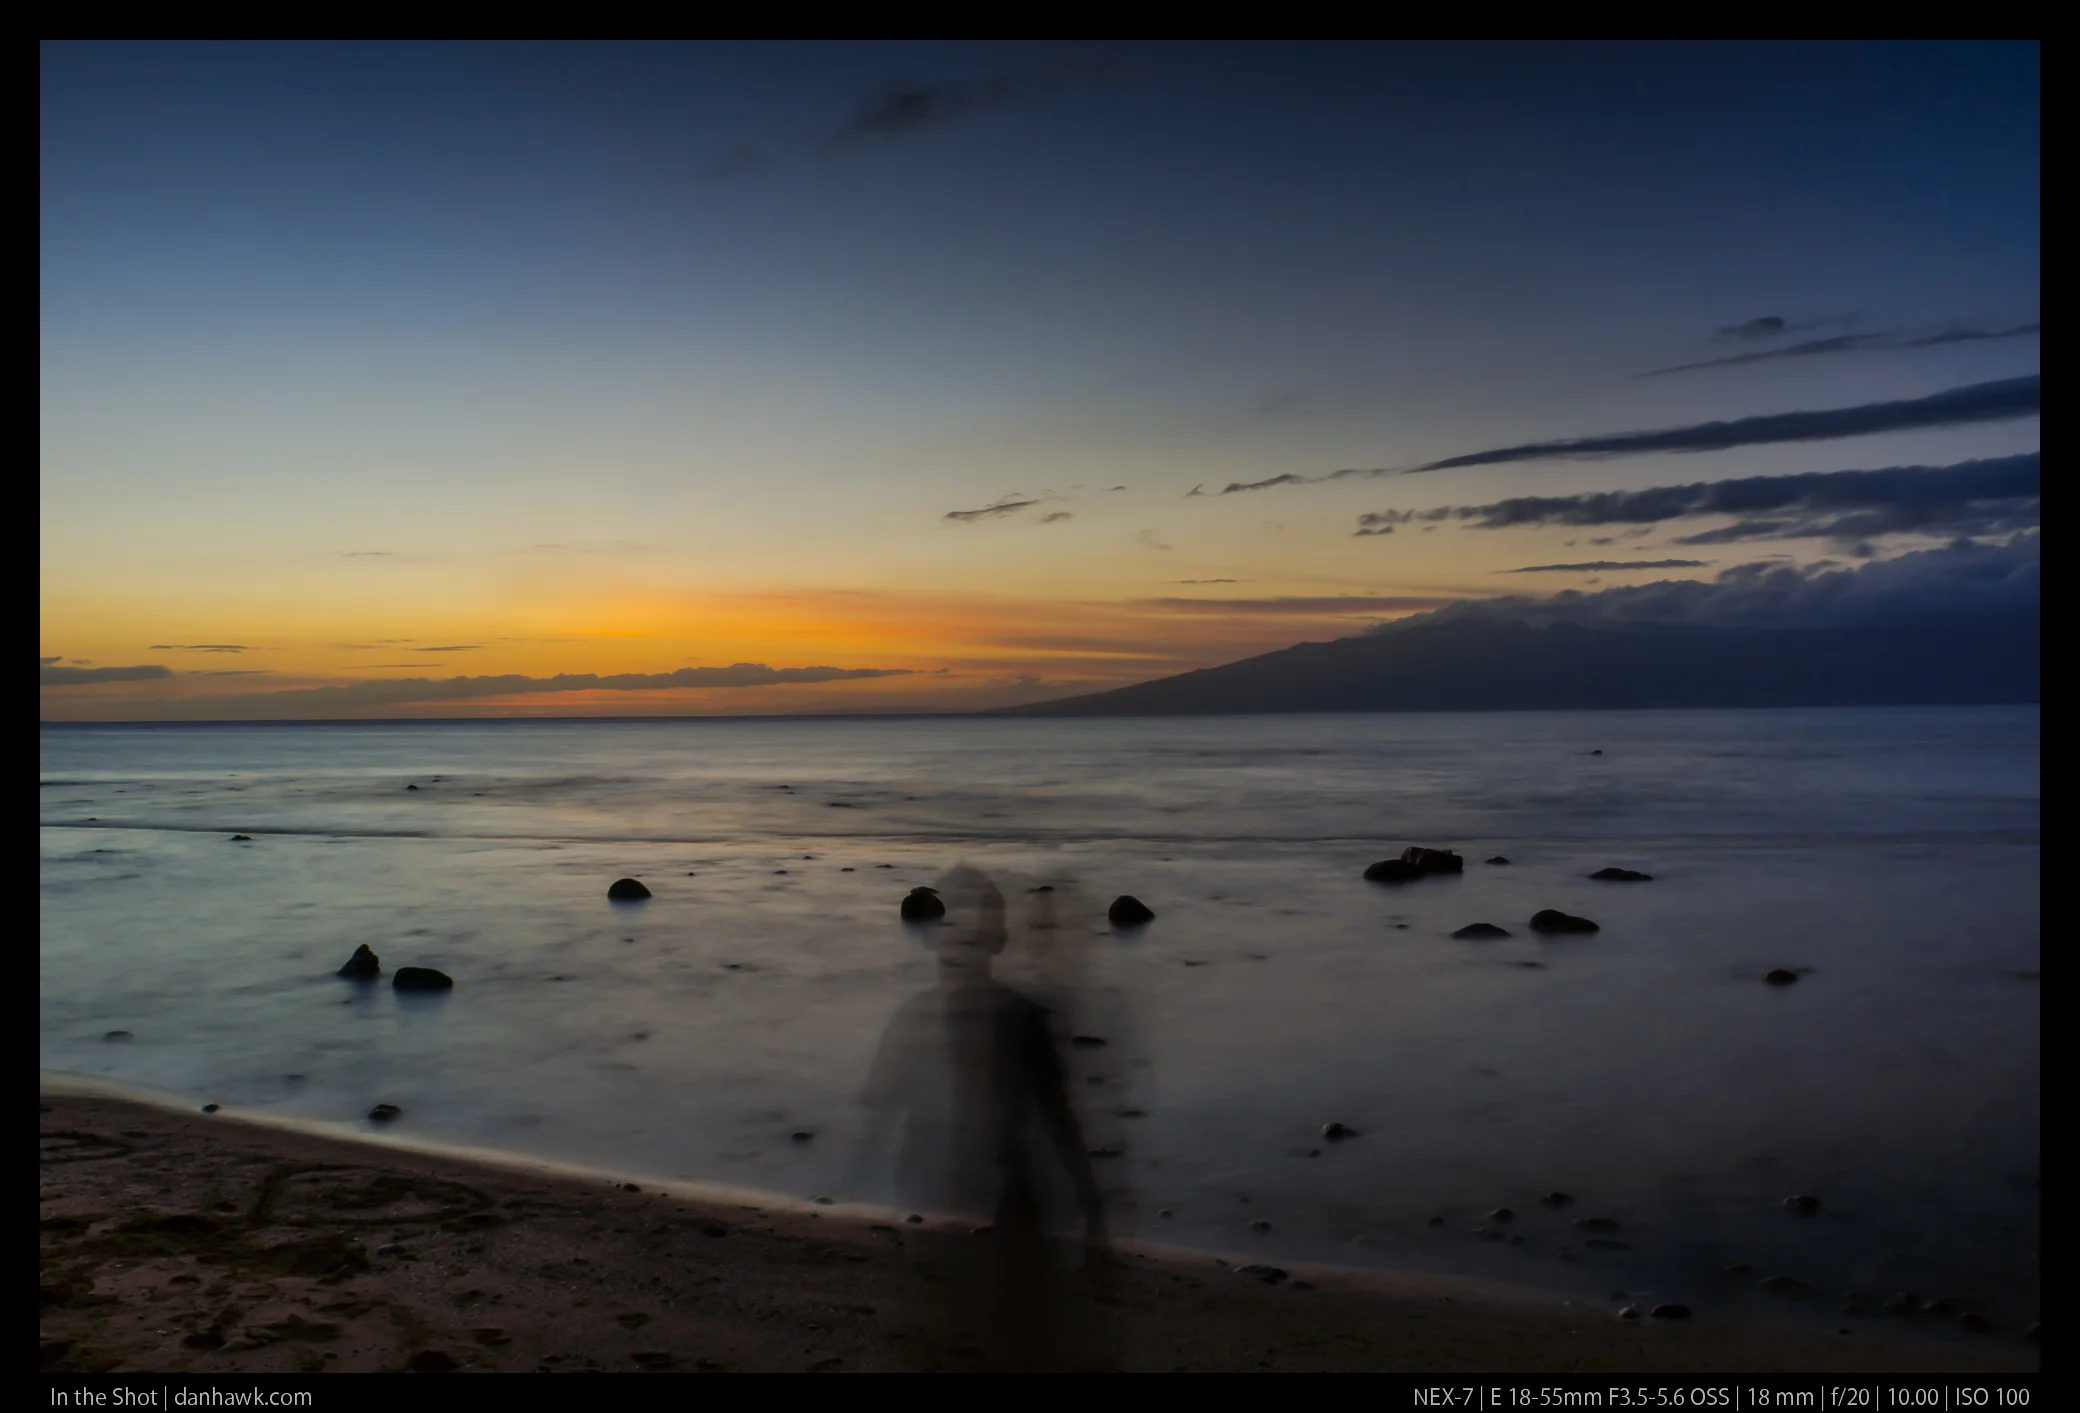
Playing with the shutter speed is one of the most common ways to experiment with composition. You can leave your shutter open to capture the motion of water, clouds, people, cars....pretty much anything. But, remember that because the shutter is exposed for longer, it will also be affected by any movement of the camera. Get yourself a tripod.
You can use the S or TV (Time Value) setting to focus on Shutter speed and let the camera choose the correct aperture. If you choose a fast shutter speed, the camera would likely open up the aperture. If you choose a longer shutter, the aperture would stop down.
ISO
ISO is the sensitivity of your sensor or Film. The numbers are based on the rating system for film sensitivity. Film comes in different sensitivities which are optimized for different conditions and our digital cameras have settings to match. The higher or lower sensitivity of the sensor is achieved by varying the amount of electrical charge to the sensor. Because of this increase of power to the sensor at higher ISO settings, you may start to notice more noise or grain. More sensitive higher ISO film has more grain. Because of this, I don't shoot film any higher than 400.
Though I positioned ISO as one of the 3 main factors, I'd recommend using it as a sort of baseline that you change less often. When you shoot with film, the ISO is something you would only change when you put in a new roll of film. When you set the ISO on the camera (or meter), your general metering and exposure is shifted based on the film you are using. Though a digital camera has the ability to change this with the push of a button, I think it's better to reserve ISO changes and mostly rely on Aperture and Shutter speed for achieving correct exposure. I generally stick with ISO 100 but change it when I'll be shooting at night, or moving between indoor and outdoor.
In addition, I personally feel that with digital cameras the higher the ISO, the more you are compromising on color. Most sensors have a base ISO of 100 where the color is most accurate. On every digital camera I've used, I see some shift in colors as you move upwards of ISO 400. Just something good to remember.
In light of the above, I recommend that you start with ISO set to 100. Aperture and Shutter speed have a much larger effect on composition and it will serve you better to start with them. Starting with ISO 100 gives you a baseline understanding and a sense of how your camera sensor handles light.
Here are some guidelines:
ISO 100 is good for bright daylight and good lighting conditions and the resulting images have little to no noise or grain and color is most accurate.
ISO 400 is still good in moderate to bright light, but can be used in overcast and indoor situations with very little noise.
When you get up to about 1600 or 3200, you can shoot in low light, and even night time scenes without a flash if you use a longer shutter speed. You will probably find that above 3200, the sensor noise starts to be an issue and because the sensor is now able to pick up more light than your actual eyes, colors can get a little weird. Because of this, if there is a shot that I really like, but has issues, sometimes it's perfectly usable in black and white.
The high ISO response is so good in many modern cameras, many people just set the camera to auto ISO and forget about it, just be aware of color. Most modern cameras allow you to set ISO to auto in all of the P, A, S, and even M modes.
I've mentioned film quite a bit here because it's the legacy that all this came from and I still shoot film. I prefer ISO 100 for Landscapes and ISO 400 for People and the darker, more overcast parts of the year. That may be an oversimplification, but it has worked well for me. It has the added benefit of removing one more variable as well. However, in order to make sure you know these are just guidelines, here are a couple examples of the opposite.
Kodak Portra 400 on the 4th of July in bright afternoon sun.
A portrait with Kodak Ektar 100 on a cold, morning just before Sunrise
Remembering what's important
Though there's a value to being gung-ho about this and only shooting in full manual, keep in mind what's important. While you are learning how all this works, don't be afraid of using some automatic mode features in situations when the stakes are high - important events. You probably got this camera to capture photos of things that matter to you, and you really don't want to miss an important shot because you are fiddling with your camera. Eventually this stuff will be second nature, but while you are still learning, don't be afraid to let the camera help so you don’t have to worry about it as much, and can just focus on the shot or the thing you’re doing.
As you learn the different variables, you can slowly move more and more towards full manual as your go-to.
I hope this helps, and please do reach out if I can answer any questions that come up as you are learning!